This is another one of those 'scratch an itch' projects - recently, was away from home and needed to dial back in to one of my home machines. It wasn’t something I was set up to do - so all I could do was wait till I got back home.
Once I got back home, I started looking into setting up a VPN server that I could use to dial home. My previous attempt involved a SSH tunnel and while it worked it was slow and frankly painful. And all that complexity and clunkiness was because my ISP (ACT Bangalore) uses CG NAT. This means that a single public IP is shared across possibly a large number of customers and so there’s no way to expose a server that you could connect to from the outside.
So the first piece of good news was that ACT is rolling out IPv6 in Bangalore… This is sort of a big deal since IPv6 address pools are much much more bountiful so you don’t need to resort to shenanigans like CGNAT. I raised a ticket with ACT and but was told that it isn’t ready and they have no idea when it’ll be rolled out.
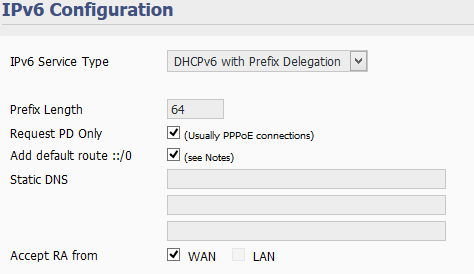
Given that folks on Customer Support are rarely well informed, I thought I’d give it a try. On my router admin page, I changed IPv6 from 'Disabled' to 'DHCPv6 with Prefix Delegation' - and lo and behold, router got an IPv6 address!
I run FreshTomato on my router - so OpenVPN was the first choice - and it sort of worked. I could reach my home network but couldn’t tunnel all traffic through the tunnel - specifically, IPv6 traffic was going over directly. Now, this wasn’t a big issue, but I did want to have the option of tunneling all traffic if I needed to. So that ruled out OpenVPN server on the router - and instead now Wireguard needs to run on a Rpi behind the router - that’s probably the only downside to this setup.
Dynamic DNS
First order of business - we need to be able to reach our RPi over the
Internet. Now, every time the WAN interface is brought up, the router gets a
/64 IPv6 address and machines behind the router (like our Pi) also get a new
address. We don’t want to type in an address and anyway it keeps changing so
the first order of business is to create a DNS record for it whenever the IPv6
address changes. For this purpose, I have a shell script that uses CloudFlare
API to update the address. Your might need to do something different based on
the DNS provider you have but all in all, it would be very similar.
#!/bin/bash
source /home/raghu/.local/cf.secrets (1)
ipv6=$(ip -6 a |grep inet6|grep -i global| grep -Pio '2[0-9a-f:]+'| head -n1)
(2)
payload=$(cat <<EOF
{"type":"AAAA","name":"wireguard","content":"$ipv6","ttl":1,"priority":10,"proxied":false}
EOF
)

# read ipv6 from file; falling back to API if needed
current=$(cat /tmp/ipv6 || curl -s "https://api.cloudflare.com/client/v4/zones/$CF_ZONE/dns_records/$CF_RECID" \
     -H "X-Auth-Email: $CF_USER" \
     -H "X-Auth-Key: $CF_KEY" \
     -H "Content-Type: application/json"\
     | grep -Pio '"content":".*?"' \
     | grep -Pio '2[0-9a-f:]+'\
     | tee /tmp/ipv6)
# logger -t CFDDNS "CF: $current; Machine: $ipv6"

if [ x$current != x$ipv6 ]; then
         curl -X PUT "https://api.cloudflare.com/client/v4/zones/$CF_ZONE/dns_records/$CF_RECID" \ (3)
             -H "X-Auth-Email: $CF_USER" \
             -H "X-Auth-Key: $CF_KEY" \
             -H "Content-Type: application/json" \
             --data "$payload"
        logger -t CFDDNS "Updated cloudflare IP: $ipv6 - status $?"
else
        logger -t CFDDNS "Skipping CF update - IP $ipv6 is current"
fi| 1 | define and store sensitive values like CF_KEY in this file and source it here |
| 2 | Define the domain name - in this case wireguard; so your machine will be resolved as wireguard.mydomain.com |
| 3 | This is a PUT request - we always update an existing DNS record - so you’ll need to create the record first and save it’s record id in CF_RECID |
You’ll also need to run the DNS update script periodically - for this, I have a cron job to execute this script every 10 mins.
*/10 * * * * /home/raghu/home/bin/cf-ddns.shSetting up Wireguard
Setting up wireguard itself is quite easy - in fact, I’m just going to link to the guide I used that walks through setting up wireguard on the Pi with NAT. The only thing to keep in mind is that I do want name resolution (DNS) to work for machines in my home network - so I also push my DNS (Rpi running Pi-Hole) to the client. In my case, this is PiHole server running on my home network.

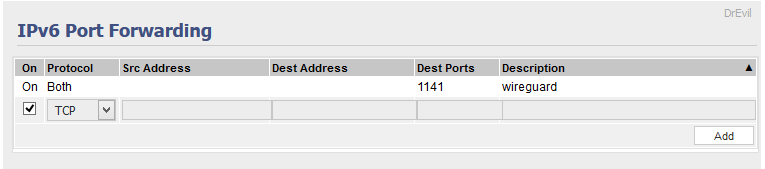
Opening ports on your router
You’d also need to tell your router to let IPv6 traffic on the wireguard port in to be allowed. You can do this on the router typically under 'Port Forwarding'
Controlling traffic that’s sent through the tunnel
If you set AllowedIPs to 0.0.0.0/0, ::/0 then ALL your network traffic will
go through wireguard. This isn’t something that I want always. In some cases, I need
only traffic to home network to go via the tunnel and normal Internet data
to go via the Wired/Wireless Lan interface.
My home network has a few different VLANs
-
192.168.1.x - trusted lan (the wireguard server rpi is on this network)
-
172.16.1.x - has a raspberry pi running PiHole for adblocking
-
172.16.0.x - Untrusted devices like smart Tv, Guest WIFI network that visitors can connect to and so on.
With AllowedIPs set to 192.168.1.0/24, 172.16.0.0/16, once I’m connected
over Wireguard, I can reach all machines as if I was at home, but other traffic
will not go over the wireguard interface.
Caveats
Keep in mind that the entire setup depends on being able to send outbound IPv6 packets. This may or may not be true. My mobile provider - Airtel - for example, usually gives my phone both an IPv4 and an IPv6 (dual mode) addresses and things work just fine. But then - a couple of times the phone got only an IPv4 address and then it just couldn’t connect at all. The trick was to force IPv6 only in your phone’s APN settings and while this works when I’m home, I have no idea on how much of Airtel’s network is IPv6
The other thing to note is that this relies on UDP being open. Now the safest choice is to use
port 53 which is normally used for DNS since that’s rarely blocked - but first make sure that
port 53 is available on your Pi since by default, systemd-resolved takes it over (and for the
life of me, I haven’t yet been able to figure out why I need systemd-resolved or how to get
rid of it in favor of good ole /etc/resolv.conf)
Summary
So we have a RPi running wireguard inside your network that you can reach from anywhere on the Internet. Once you establish Wireguard VPN connection, you have a secure link back to your home LAN. You also get to choose, quite trivially, what traffic should/should not go over your tunnel.
It was my first encounter with IPv6 and I’m glad to be out of CGNAT hell. Wireguard’s a joy to setup and use.
Links
-
http://www.steves-internet-guide.com/ipv6-guide/
